

Creality Ender 5S1 Review: More speed and premium features
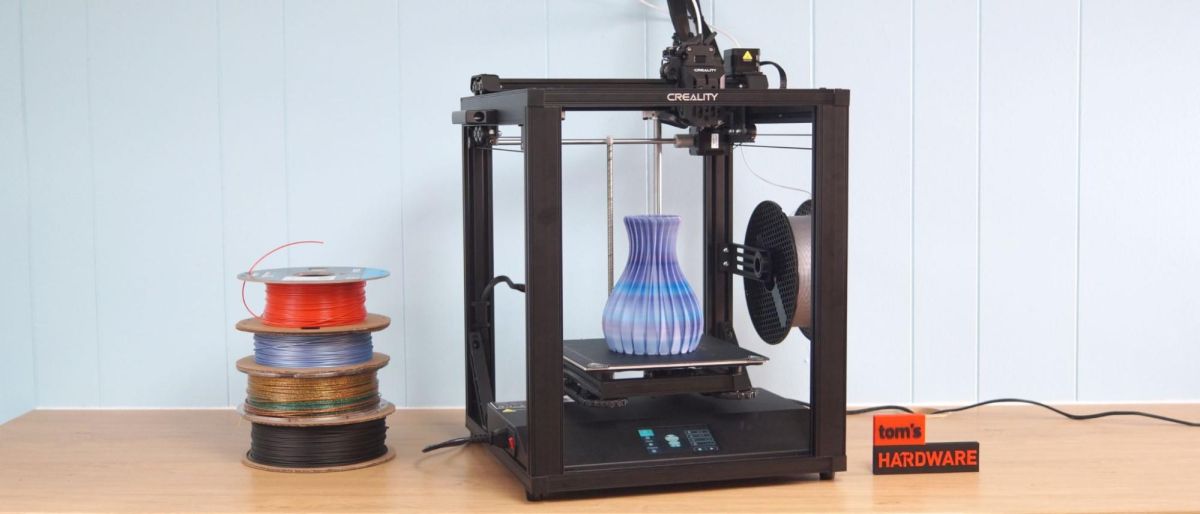
Creality’s Ender 5 S1 is the latest rendition of its sturdy cube printer. There have been significant improvements to the design such as an all-metal hotend and direct drive, along with an auto bed leveling system and a stronger, reinforced frame.
Available at $559, ready to compete against the Best 3D Printers The Ender 5 S1 is comparable in print volume to the more expensive model. Ender 3 S1 The print bed is 10mm higher than the standard and compacter on the Z axis. Because the print bed moves upwards and downwards, instead of backwards and forwards, this is possible. It’s not a Core XY machine, where the X and Y axis are driven together by belts, but it IS a lot smoother.
Creality claims that the Ender 5 S1 is capable of running at 250 mm/s. But the Creality Slicer profile runs at 120 mm/s. The prints came out a bit slower after I set the speed to 250mm/s. This is largely due to limits in acceleration – no printer can instantaneously hit maximum speeds then maintain them while going around corners.
This machine is quite fast, even though it still runs Marlin. Its acceleration firmware limit is 3000 mm/s – whereas an Ender 3 S1 Pro is held to 500 mm/s. We can’t wait to see how much speed it gains when it is hooked to a Creality Sonic Pad (opens in a new window) Klipper was allowed to continue running in future reviews.
The Ender 5 S1 comes with a lightweight, direct drive with all metal hotend. It’s something I love to see on new printers. This hotend’s melt zone was taken from the Spider high-temperature hotend. However, it allows for a higher flow rate and requires a longer nozzle. This could confuse buyers who accidentally buy the traditional MK8 nozzle used in every other Creality machine and find it doesn’t work with the Ender 5 S1.
Specifications: Creality Ender 5S1
Scroll horizontally with a swipe
| Increase Volume | 220 x 220 x 280 mm (8.7 x 8.7 x 11 in) |
| Material | PLA/PETG/ABS (upto 300 degrees) |
| Type of Extruder | Direct Drive |
| Nozzle | .4mm Spider |
| Build a platform | Heated PC Spring Steel |
| Bed Leveling | CR Touch Auto-Leveling |
| Filament Runout Sensitor | Yes |
| Connectivity | Type-C SD card and USB Type-C |
| Interface | Touchscreen color touchscreen 4.3 inches |
| Machine Footprint | 425x 460 x 570 mm (16.7 x 18.1 x 22.4 in) |
| Machine Weight | 12.1 kg (26.6 pounds) |
Creality Ender 5, S1 included in the box

You get everything you need to start using the Creality Ender 5 S1: tools to set up and maintain the printer as well as side cutters, side cutters, and a scraper. A spare nozzle is also included, as well as a sample of white PLA 200 grams.
There’s a paper copy of the quick start guide to help you get set up. The SD card contains three test models, the full PDF manual and a video that will help you assemble it.
The leveling instructions in the paper quickstart guide I received were not correct. Use the PDF to guide you.
Assembling Creality Ender 5, S1

The Ender 5 S1 kit is DIY and requires a lot of assembly. The entire assembly took me less than an hour. If you’re a beginner to the world of kit printing, however, it might take you a while longer. Although parts were clearly labeled and the instructions were clear, it was hard to follow. As a result, I ended up sticking some things in reverse. This led to frustration and delay.
It is extremely helpful to watch the build video. I highly recommend digging the box out and then watching it.
Creality Ender 5 S1: Leveling the Creality

The Ender 5 S1 Pro has a CR Touch. This makes leveling much easier. The bed must be adjusted manually using the adjustment screws. After that, the CR Touch probes and compensates for any bed deformities.
This quick start guide gives incorrect directions for leveling the machine. These directions were followed and the knobs almost fell off.
The PDF manual contains the correct instructions.
First, select Leveling Method from your settings menu. Next, click on the home button (a picture of a house icon), which will bring the bed to zero. Continue clicking the up arrows till the bed touches the nozzle.

Place a piece of paper underneath the nozzle. Click one of the corners (labeled 2, 3 or 5) to adjust the bed. Repeat this process for each corner.
After manually leveling, click AUTO LVL →Start and the printer will immediately go into its leveling routine. It will tap 16 points on your bed using a metallic probe, and then create a mesh to smoothen out any high or lower spots.
You’re not done yet – after the Auto Level you need to check the final Z Offset. Slide a piece of newspaper under the nozzle by clicking the Home button once more. If you can’t get paper under the nozzle, tap the down button until you can. Adjust this setting until the paper touches the nozzle.
Although it is difficult to get the Z height right using the paper method you can easily adjust the print on the fly. Watch the first layer go down. If the nozzle needs more or less, tap the Z button and adjust.

Creality Ender 5S1: Loading Filament

The Ender 5 S1 features a direct drive and a reverse Bowden tub to guide filament upwards from a side-mounted spool holder. To load filament you need to first trim the end of the plastic at a 45-degree angle – a pointy end feeds through the gears better.
The filament is then pushed through the Bowden tube, through the Bowden sensor and into the direct drive. The tube is not secured to the extruder. You can easily pull it off to view the filament. It is easier for me to pull back the tension lever, and push the filament into the drive.
Start the hotend by pressing Prepare on the main menu. Next, select the PLA or ABS present. You can also set your own temperature. After the hotend has reached the right temperature, you can switch to the In/out menu at the bottom of your screen and enter a number to advance the filament. 50 mm is a good number to start – you may need to run more if you’re switching from a bold to light color.
Design of the Creality Ender 5 – S1

The Ender 5 S1 open frame 3D printer has a simple, compact design. It also has a small footprint. The bed moves up and down rather than back and forth, yielding a smoother print that doesn’t suffer from Z wobble at taller heights.
Cable management is excellent on this updated version – I’ve seen older Ender 5 machines where bare wiring is allowed to run amok carelessly. The printer includes a few custom clips and black zip ties that will securely attach the bundled wire.
The printer’s case and touch screen are combined into one smooth unit at the base of the machine and the spool holder is mounted sideways to the frame. The footprint is kept small and almost square by this combination.
Another improvement in design is the addition of bracing – a pair of brackets steady the frame and two more are underneath the build plate.
Creality created hollow silicone bed mounts that fit over the leveling springs. Solid silicone mounts should be used instead of springs. The theory is solid silicone mounts are more stable than springs and won’t vibrate loose over time. After printing for a few days, however, the unit I tested fell off its level. The leveling knobs don’t have a tight grip on the screw, which could be allowing them to slowly loosen after many hours of printing. Lock nuts can be added or removed. Light threadlock (opens new tab) The leveling screws might be a good option.

According to the manufacturer, this direct drive is a Sprite. I checked it out on the Ender 3 S1 Pro. However, this particular tool head has a custom cooling system and a hotend with aspects similar to Creality’s new high temperature Spider hotend (opens in a new window).
This is one of those mixed-up good and bad news stories. The cooling system has a larger 5015 fan and wrap-around ducts that channel air to both the right and left sides. More good news is the Spider-like hotend has a titanium alloy heat break and a larger heater block – this allows filament to flow hotter and print faster. All metal hotends also jam less frequently since there’s no PTFE tube touching the metal where it can start to burn and degrade with time.

The bad news? A longer Spider nozzle will be required to reach the larger Spider melt zones. Creality does not state that the nozzle is not standard in either manual.
The Spider nozzle lands somewhere between E3D’s Volcano and Creality’s normal MK8 nozzle. It’s been out long enough – this nozzle was first used in the Ender 7 – that third party manufacturers like Microswiss started making Upgraded replacement nozzles (opens new tab), so you’ll have choices when shopping for replacements. But you need to know what you’re looking for.

I’m concerned that calling this new tool head a Sprite and not a Spider will lead to someone attempting to stick an ordinary MK8 into their Ender 5 S1 extruder. It will fit – the diameter remains the same, but the shorter length will leave a gap and cause filament to puddle within and form a nasty clog.
The removable build plate is made out of flexible coated steel. It’s amazing. The soft PC coating can be easily damaged, which is a little disappointing. Already my plate has suffered some scratches and even a gouge due to the mistake I made in the leveling instructions. The surface does a good job of holding onto prints, but if your Z height is a bit too close you’ll end up embedding plastic into the surface. This is not fun.
The bed is standard Ender size, and the plate can be replaced easily. I’d recommend swapping it with this Double-sided PEI plate (opens new tab) Comgrow has both smooth and texture surfaces.
If you’re interested in printing a lot of ABS, you should consider adding an enclosure to this machine to protect it from drafts and keep the build area toasty. A simple enclosure can be added to your ABS printer. tent style enclosure (opens in a new window) You can get it for less than 100 dollars
Preparing Files/Software

Creality Slicer version 4.8.2 comes with the Creality Ender 5 S1 This Cura is a customized version and includes profiles from every Creality printer. You could use Cura or PrusaSlicer if you like, but as there’s no default profiles available for 3rd party slicers you’ll have to modify the profile for the older Ender 5 Pro.
First, I noticed that the default profile was set at 120 mm/s. This is lower than Creality’s claimed print speed of 250 mm/s. The acceleration is also set at 500 mm/s when the machine can handle a maximum speed of 3000mm/s. Thankfully, Cura cannot override the machine’s settings unless “Enable Acceleration” is checked – if you leave it unselected, Cura only uses that data for estimating print time.
This means Cura’s stock estimates are wildly inaccurate. Cura was wrong to believe that my 250 mm/s Benchy would print 24 minutes faster. You can find the machine’s actual limits on the control panel (under WHAT). These numbers were plugged into Cura (3000 for acceleration, and 15 for jerk), and I was able to get closer to the reality. But not perfect.
The difference in speed between 120 and 250mm/s is not significant. Benchy shows a difference of only 3 minutes. The machine must accelerate to the maximum speed and then slow down to turn a corner. Just like your car, it can’t reach top speeds instantaneously. Even if it covers all of the bed, it will not reach its maximum speed.
Printing on Creality Ender 5, S1
The Ender 5 S1 comes with a generous sample spool of PLA, but you’ll need more before you know it. Our guide to the Ender 5 S1 includes a generous sample spool of PLA. Best filaments for 3D printing for examples of our favorite materials when you’re ready to add to your supply.
The first print that I did on the Ender 5 S1 consisted of a pre-sliced rabbit, which came preloaded on an SD car. The sample spool was made of white PLA, and the print came out clean.

Next came several Benchy’s to test the Ender 5 S1’s quality at speed. The Benchy seen on the left was printed at Creality’s suggested speed of 120 mm/s, which printed in 1 hour and 11 minutes. The one on the right is printed at 250 mm/s, the top speed listed on Creality’s website. It took 52 minutes to print. That’s an HOUR faster than an Ender 3 S1 printing at with standard settings and a recommended speed of 50mm/s.
The difference between the 120 and 250 Benchys are negligible – the faster boat on the right has a little rough spot along the door and some stringing at the stern. Print in Prusament Silver. (opens in a new tab

One of the best reasons to buy a printer with a bed that doesn’t fling back and forth is the ability to make smooth lithophanes. Lithophanes Photo prints that are thin and 3D printed. The more smooth the print, the better your photo. The sample PLA was used to print this photo at a.16mm layer height at 120mm/s. It took just 4 hours and 42 minutes. By comparison, my Ender 3 Pro had to be slowed to 40 mm/s to achieve a decent lithophane and took over 10 hours to print the same image – and it’s not this smooth.

PETG was impressive. The Ender 5 S1 printed the two print-in place flexi alligators without stringing or issues. They were printed with three walls for strength and 15% lightning infill. The.2 layer height was used for speed. The left one was printed at 120mm/s in just 1 hour and 17 min. The right one was printed at 250mm/s, and took just a few more minutes to print at 1 hour 13 minutes. This is another case where the printer simply can’t achieve it’s highest speeds due to the complexity of the print. Alligators are printed in Inland Green PETG (opens new tab).

The Ender 5 S1 features an all-metal hotend that allows it to run at higher temperatures without causing PTFE tubes damage or clogs. Although the open frame may not be ideal for ABS materials, this printer is located in a draft-free room so I decided to give it a try. I was rewarded with a beautiful print that didn’t warp or string. This print took only 25 minutes and was printed at 120mm/s with a layer height of.2mm. Print in Inland Blue ABS (opens in a new tab.

Finally, I have the TPU Cute Octopus. It was easy to print at normal speed without having to slow it down. This is one of the best TPU prints I’ve seen in a long time and required no clean up at all. It was printed at 120 mm/s and had a.2mm layer. The entire process took just 1 hour, 35 minutes. An Ender 3 S1 This would take at most 4 hours to print. Print it Matterhackers Build Series Purple TPU. (opens new tab)

Bottom line
The Ender 5 has undergone a significant improvement over the S1 and Pro editions. It’s now faster, easier to level, less likely to jam and more sturdy to prevent vibrations from marring prints. Although it would be great if the Ender 5 S1 had a more durable surface for its bed, this part can be easily upgraded as needed.
The Ender 5 S1 3D printer retails at $559 and is an excellent choice for Makers looking for a smaller machine but that can move much faster than traditional Cartesian printers. This printer is the best of our offerings. It features an all-metal hotend, CR Touch and is very affordable. These are the best 3D printers currently available.
Creality seems to be capitalizing on the 3D print community’s obsession with speed, and may be overselling the Ender 5 S1’s capabilities a bit. It’s not as fast as the AnkerMake M5Ours is a true 250 mm/s. favorite fastest printer. This machine can reach 150 mm/s reliably and can easily run circles around an Ender 3 S1. It’s definitely
My only real issue with the Ender 5 S1 is how Creality did not draw attention to the longer high temperature nozzle they’ve slid into the customized Sprite extruder. I hope they will update the manual and website to inform people what replacement is required.
MORE: The Best 3D Printers
MORE: Best Resin 3D Printers
MORE: The Best Filaments For 3D Printing
https://www.tomshardware.com/reviews/creality-ender-5-s1