


3D Printering: Swap And Klip(per)

Final time I attempted to persuade you that, for those who haven’t already, it is best to attempt operating your 3D printer with Klipper. There are a number of methods to really make it work.
The very first thing you want is one thing to run the Klipper host. Most individuals use a Raspberry Pi and if you have already got one which runs OctoPrint, for instance, you would possibly nicely use it. Simply tuck your SD card away in case you quit and set up a contemporary Linux system on a brand new card.
Nevertheless, a Pi isn’t your solely choice. You need to have the ability to make it work on practically something that runs Linux. We’ve even seen it operating on Home windows below WSL. When you have an outdated laptop computer that may run Linux, that might work, too. We’ve even heard it really works on a Chromebook.
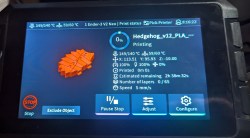
The opposite choice is to get a “pad.” A number of distributors make touchscreens with some Linux single-board pc bundled along with Klipper preinstalled. For instance, there’s the Creality Sonic Pad, together with comparable units from different 3D printing corporations.
For those who determine to go that route, you would possibly need to be sure it’s straightforward to put in your personal software program simply. Some pads, just like the Creality unit, are infamous for having a lot customization that they don’t lend themselves to upgrades until they arrive from the producer. In some instances, you may wipe out the inventory firmware and set up a traditional working system, however at that time, you would most likely simply purchase a Pi and a touchscreen, proper?
Set up
For those who use one thing like a pad, it most likely has a menu choice to offer prebuilt firmware in your printer. Usually, you let it save the code to an SD card or a USB stick after which you’re anticipated to flash it to your printer which, after all, is determined by what sort of printer you’ve got.
In case you are rolling your personal, you employ a menu configuration program one thing like constructing a Linux kernel. When you have a pre-built configuration file, it’ll most likely inform you in its feedback what issues it is best to choose. It’s essential know, for instance, the kind of CPU your board has, the bootloader offset, and if you’re connecting through USB or serial. Yow will discover particulars on the Klipper challenge pages.
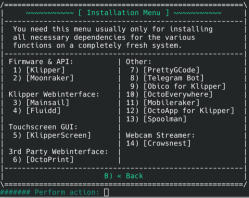
Putting in the Linux facet is straightforward as a result of there’s a good script known as KIHUH. The simplest factor to do is clone the Git repository and run it. From there, you may set up Klipper, Moonraker, Fluidd, Mainsail, and another issues, too.
The actual trick isn’t putting in the software program. The problem is creating a correct configuration file in your printer. When you have a completely inventory and in style printer, you’ll most likely be in luck. However, how many people can say that?
Begin with the GitHub record to see in case your printer or board is there. Even when it isn’t a precise match in your {hardware}, it provides you with a begin. For instance, my customized printer is a Fysetc Spider, however the canned configuration is for a core XY machine, which implies I’ve to make adjustments.
Even for those who get a pad that claims to be “plug and play,” don’t depend on it. For instance, a Creality Sonic Pad’s directions for putting in with a Creality Ender 3 first asks you to take the printer aside to find out the kind of motherboard you’ve got. That’s probably not plug and play! Any deviation from the inventory machine is prone to require you to vary the default profile.
Ch…Ch…Ch…Adjustments
Along with simply setting issues as much as match my actual {hardware}, I additionally wanted to regulate the extruder step depend. That must be easy, proper? Most firmware requires you to plug within the variety of steps per millimeter of filament.
Klipper, alternatively, needs to know what number of millimeters extrude from a full rotation of the stepper. If you understand how many steps (and microsteps) your printer makes use of, you may simply calculate both quantity from the opposite. For instance, if in case you have 200 steps per rotation and 16 microsteps, that’s 3200 steps whole. In case your present steps per millimeter is 100, then your Klipper “rotation distance” is 3200/100=32.
Configuration Instance
I had one other main change to make. My printers have a non-standard filament sensor that detects the filament transferring. That method, it could actually detect not solely damaged filaments however jammed filaments, too.
To put in it, I had so as to add just a few traces to my printer.cfg file and restart Klipper. Since I’ve a couple of printer with the identical sensor, I put all of the traces in a single file after which included it in every printer. So the printer.cfg change was quite simple:
[include sfs.cfg]
Then the actual work is in sfs.cfg:
[filament_motion_sensor SFS_T0]
detection_length: 10.00
extruder: extruder
switch_pin: ^PA4
pause_on_runout: True
event_delay: 3.0
pause_delay: 0.5
runout_gcode:
  M117 Runout Detected!

[delayed_gcode DISABLEFILAMENTSENSOR]
initial_duration: 1
gcode:
 SET_FILAMENT_SENSOR SENSOR=SFS_T0 ENABLE=0

[gcode_macro SFS_ENABLE] ; Add this to PRINT_START
description: Allow sensible filament sensor
gcode:
  M117 ENABLING the Sensible Filament Sensor
  G92 E0
  SET_FILAMENT_SENSOR SENSOR=SFS_T0 ENABLE=1

[gcode_macro SFS_DISABLE] ; Add this to PRINT_END and PRINT_CANCEL
description: Disable sensible filament sensor
gcode:
  M117 DISABLING the Sensible Filament Sensor
  G92 E0
  SET_FILAMENT_SENSOR SENSOR=SFS_T0 ENABLE=0
This defines just a few macros you need to use elsewhere. Like Python, the indentation issues. You possibly can arrange your information utilizing [include], and that’s particularly helpful if in case you have a number of printers that may share information.
Reference
So, how are you aware what’s out there? The Klipper reference. It’s going to present you all of the configuration sections you need to use and what can presumably go in them. Don’t neglect that some options — like print standing notifications — can be within the Moonraker configuration which is a separate doc.
Because the system is in Python, you may hack on it to your coronary heart’s content material. Simply again up first. For instance, you may add some customized Python scripts within the klipper/extras listing, just like the one that may run arbitrary system instructions from G-code.
Tinkering is what most of us like the most effective, and there’s loads of alternative to tinker with right here. Klipper can be a great way to place new life in a really outdated printer since what runs on the printer could be very easy, and all of the heavy lifting is completed elsewhere.
Klipper can simply do adaptive mattress leveling, for instance. For those who can work in Python, additionally it is straightforward to experiment with issues like unique sensors.